You see deeper progress in the work you do, you are better at sports, you improve your finances. And, at the same time, you are aging. You might have less energy sometimes, your skin may lose elasticity and you might notice your first fine lines or wrinkles. Of course, it is up to you to do whatever you can to stay healthy and live longer. And makeup techniques we will cover in this article might help you to look better and hide those little imperfections. In the next paragraphs, we will have a look at different makeup techniques that will help you look beautiful.
Classical makeup approach
Step 1. Moisturize
The first thing you start with is hydrating your face. It's important to have it moistured before applying makeup.
Consider using a tinted moisturizer instead of the usual one. It's a good option if you are looking to create a natural look without the heaviness of the traditional foundation. Tinted moisturizers offer less coverage than BB or CC creams, and many of them offer hydrating properties and SPF protection. Therefore, it might be redundant to use a moisturizer in this case. However, if it's a special day for you and you will be applying a full-coverage foundation, nourishing your face with moisturizer is a good thing to do.
Step 2. Prime
Remember you've done your makeup in the morning and after half a day your makeup seems to wear away somewhere? You aren't alone. Primer will help you to ensure the makeup stays on your face as it should be longer. Moreover, if you are applying shadows to your eyes they will look much better if you primed them.
However, if you want to minimalize your skincare routine, you can use a moisturizer and add aloe vera gel to it, which can work as a primer. If you plan a day outside and the UV rays are high, sunscreen can also work as a primer.
Step 2. Apply foundation
To create a flawless and perfect look, use foundation. You can opt for sheer, medium, or full coverage foundation, depending on your goals for this day. Some foundation formulas provide extra benefits that are good for your skin, for example, the ones that contain hyaluronic acid (helps to reduce fine lines), Vitamin C (brightens the skin), and SPF, such as titanium dioxide or zinc oxide.
If you have problem zones on your face, for example, redness on your chin or dark circles on your eyes, you can skip applying foundation to those areas. You can just apply concealer to these areas and blend it all smoothly. Also, you can skip using the foundation for the areas where you plan to apply the contour, like the top of your forehead.
Step 3. Use a concealer
You haven't slept much and have these awful dark circles under your eyes? Concealer is a must-have in your makeup bag. It will help you to neutralize redness or hide under-eye circles.
Apart from a regular concealer, that has a shade of your skin tone, you might want to try a color-correcting concealer, especially if it is an important day for you. Color-correcting concealers hide the specific problems on your skin, for example, redness, or dark circles under your eyes. The basic two shades of color-correcting concealers are:
-
Orange or peach: to neutralize dark circles under your eyes
-
Green: to hide redness, rosacea, or pimples
Set 5. Contour and highlight
Contouring and highlighting will help you to add depth and structure to your face. You can do it by applying a darker shade on the areas you want to recede and a lighter shade on the areas you want to accentuate. Highlighting varies slightly based on your face shape, you can adapt it as you wish, please see the image below.
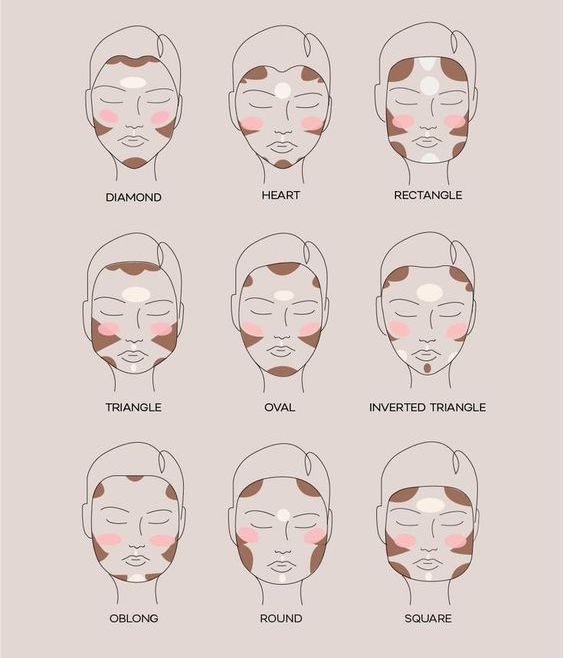
To create a delicate and refined look don't forget to highlight your nose and your eyes.
Step 6. Set the base
Who doesn't want their face to look soft and velvety? Many makeup artists opt for a loose setting powder or for finishing powder to create a smooth and natural look and decrease the shine and oiliness. By the way, to target excess oil that accumulates on your face throughout the day, you may want to try natural oil absorbing sheets with bamboo charcoal. These oil blotting sheets won't ruin your makeup, as they are made from wood pulp soaked with bamboo charcoal.
Some of the powders, such as mineral powders are natural SPF protectors and may add an extra layer of sunscreen protection to your face if you are spending a day in the sun. However, look for a high-quality mineral powder as it may be harder to blend, because it contains zinc oxide and titanium dioxide and may leave a white cast.
Step 7. Blush
A blush is an essential element for professional makeup artists, as the blush adds warmth and a deeper definition of your face. Blush can be used for face contouring, in combination with bronzer. Start with a light hand and add the color gradually. Don't forget to blend it all properly.
To choose an appropriate brush shade, you have to define your skin undertone. Knowing your skin undertone helps to understand which eyeshadows look the best on you, and which colors match your face best. For warm undertones choose peach, coral, apricot, or bronze blushes. For cool undertones, you can opt for pink, mauve, berry, rose or plum blush shades.
Step 8. Define your eyebrows
Your eyebrows act as a frame to your face. Well-accentuated and groomed eyebrows will enhance your look, and draw attention to your eyes, making them appear brighter and more vivid. Especially if you have applied makeup to your eyes, eyebrow makeup will complement your look and create a refined and polished appearance.
The first and basic step with eyebrow makeup is brushing your eyebrows. The hairs might grow in different directions, so brushing your eyebrows regularly, for example, before you are going to bed, or in the morning will help your eyebrows look better naturally.
Next, you outline the shape of your browns and fill in the gaps or spare areas. The most popular products are brow pencil and powder. When the product is applied, don't forget to blend it all smoothly and brush your eyebrows again. You may also want to use a gel to ensure brow hairs are set in place. If you are having a special day out, you might want to highlight your eyebrows by applying a small amount of concealer just below the brow bone. However, don't forget to blend the concealer carefully, you may want to start with a really low amount to ensure it is well-blended.
Step 9. Do eye makeup
Your eyes are a window to your soul. Many of us would like our eyes to look more expressive and brighter. Having well-defined eyes helps to boost your confidence and enhance your natural beauty. Eye makeup is considered to be a fundamental part of a beauty routine, complementing the foundation, blush, and lipstick.
Eye makeup starts with a primer on your eyelids. If you have already primed your eyelid that's great. Next, you apply the eyeshadows, starting from a light base color, a medium transition shade, and a darker eyeshadow color for the corner of your upper eyelid to add depth to your look.
It's very important to blend all the eye shades diligently, ensuring that there are no harsh lines.
Once you are done with eye shadow, it's time for an eye pencil. You might want to gently pull the eyelid taut and draw light strokes along your upper lash line. Use a medium transition eyeshadow to contour your lower lash line.
And the final step of your eye makeup is mascara. Who doesn't want her lashes to look voluminous and longer? Mascara makes your eyes appear more sensational and lively. You start by applying mascara to the upper lashes, using a zigzag motion several times to ensure all the lashes are coated evenly.

Step 10. Apply a lipstick
The final step in your professional makeup routine is to choose a lipstick or lip gloss that complements your skin tone and look. One of the professional makeup artists once told me: "The focus should be either on your eyes or on your lips. You can't have both expressive eyes and lips, that's too much". Indeed, if you focus on your eyes, your lips should be neutral. Or vice versa. That will prevent your makeup to look overly cluttered.
Before you apply lipstick, ensure your lips are exfoliated and your lip surface is smooth. Next, you might want to moisturize your lips with a lip balm. And only after that you should apply a lipstick. To create a long-lasting lip color, you might want to blot your lips with high-performance oil absorbing sheets and reapply another layer of lip gloss.

